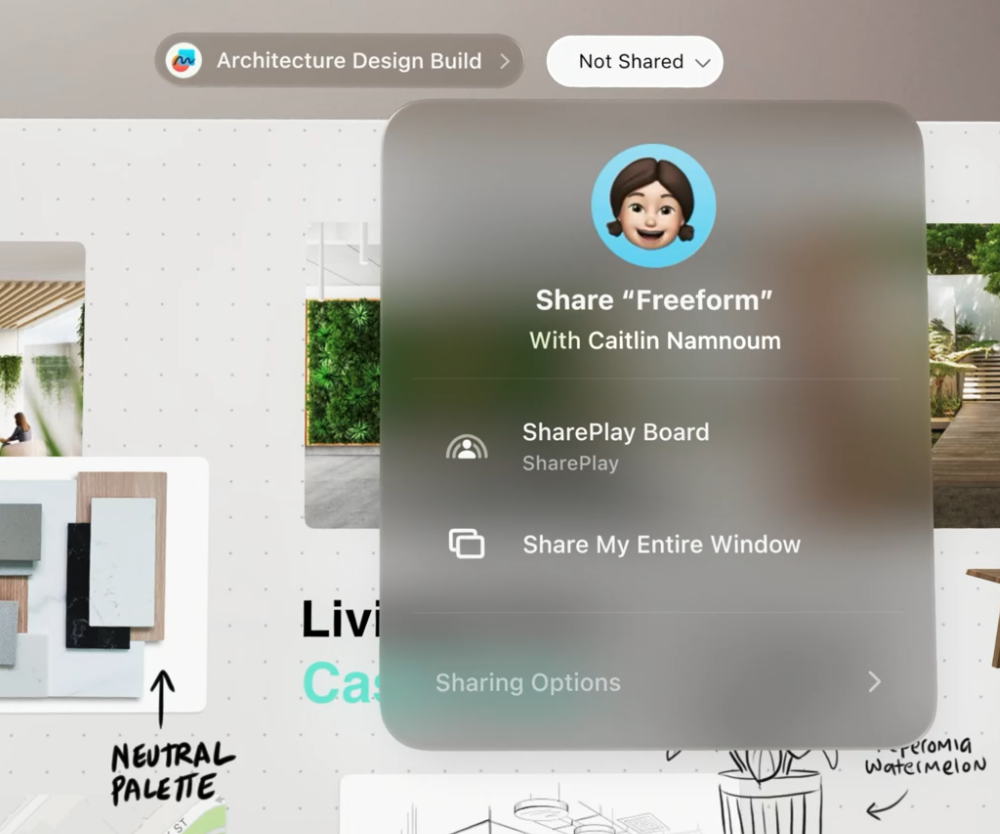
Build spatial SharePlay experiences
Build spatial SharePlay experiences
The next step Apple suggest is to learn about the SharePlay, lets check out how we can create Group Activities in spatial computing
“Discover how you can use the GroupActivities framework to build unique sharing and collaboration experiences for visionOS. We’ll introduce you to SharePlay on this platform, learn how to create experiences that make people feel present as if they were in the same space, and explore how immersive apps can respect shared context between participants.” -Apple
Also see Add SharePlay to your app
Overview
-
SharePlay has always been about being present with others and doing something together, whether nearby or far apart.
-
On this platform, we can increase the feeling of being present while in FaceTime.
-
In FaceTime on this platform, all Spatial Personas will take up a physical space in your room instead of being constrained to a single window.
-
This increases the feeling of being together with others.
-
-
On top of this, we introduce shared context.
-
Shared context means that everyone will see everyone else in the same relative position.
-
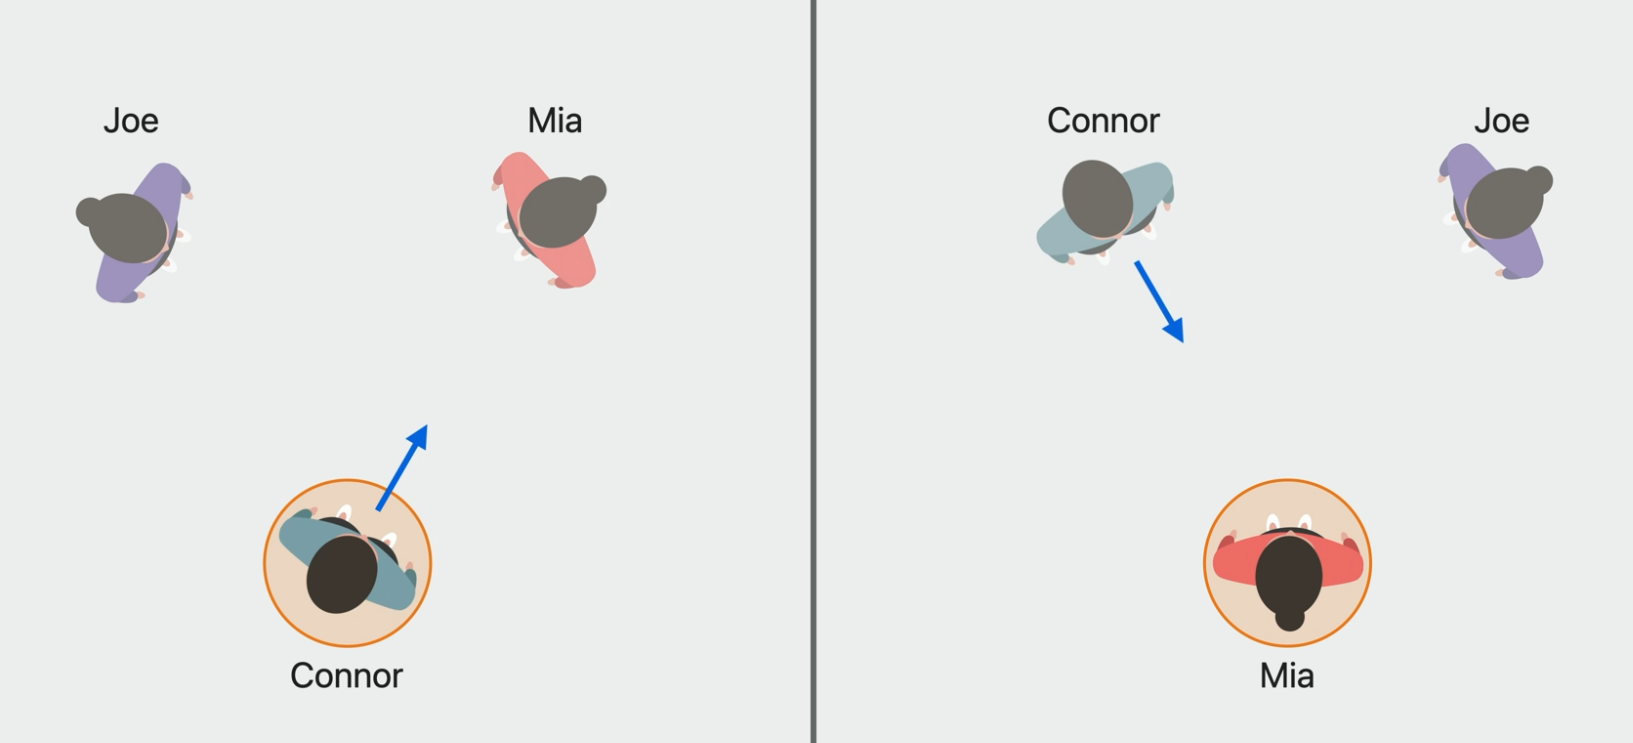
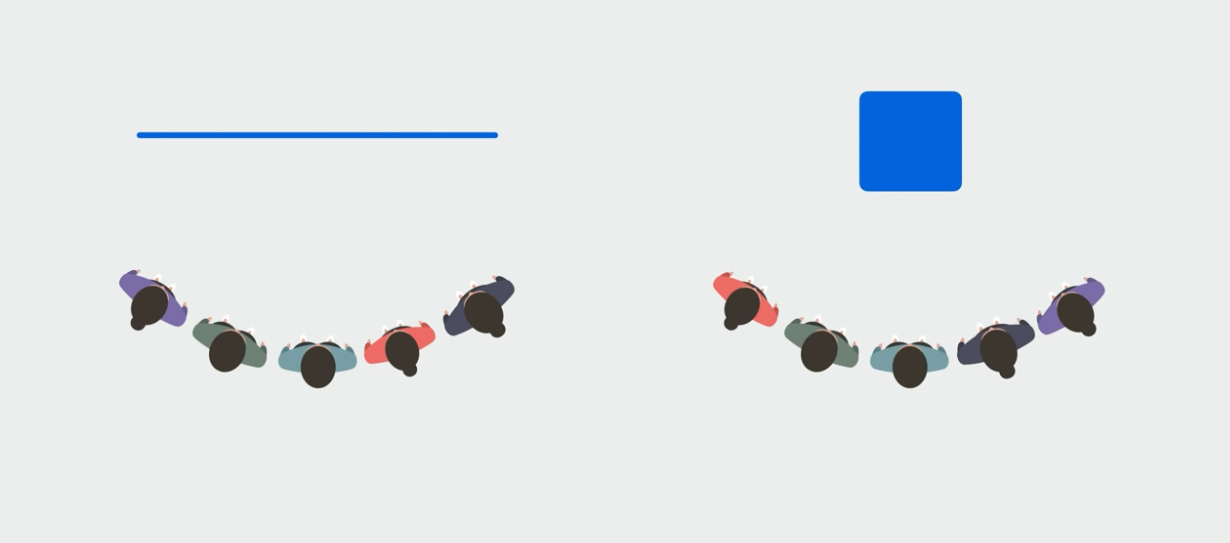
To illustrate this, consider two different perspectives.
-
The left side shows Connor’s perspective, and the right side shows Mia’s.
-
If Connor points to the Persona of Mia, Mia will see Connor’s Persona pointing to her.
-
We extend this to shared experiences, including SharePlay, where the system will place the window in the same relative position for everyone.
-
-
-
It uses templates for this.
-
Templates are used to determine how participants and a shared app will be arranged relative to each other.
-
This will lead to spatial consistency.
-
Apps don’t need to handle displacement themselves and can rely on the system for this.
-
-
One thing that apps should worry about is having visual consistency.
-
Visual consistency means that everyone is seeing the same content inside the app.
-
Imagine being in front of a whiteboard with others.
-
Everyone will have the same view of the whiteboard.
-
And whenever someone points to something, the others can see what they’re pointing at.
-
We want to replicate this in spatial experiences with SharePlay.
-
-
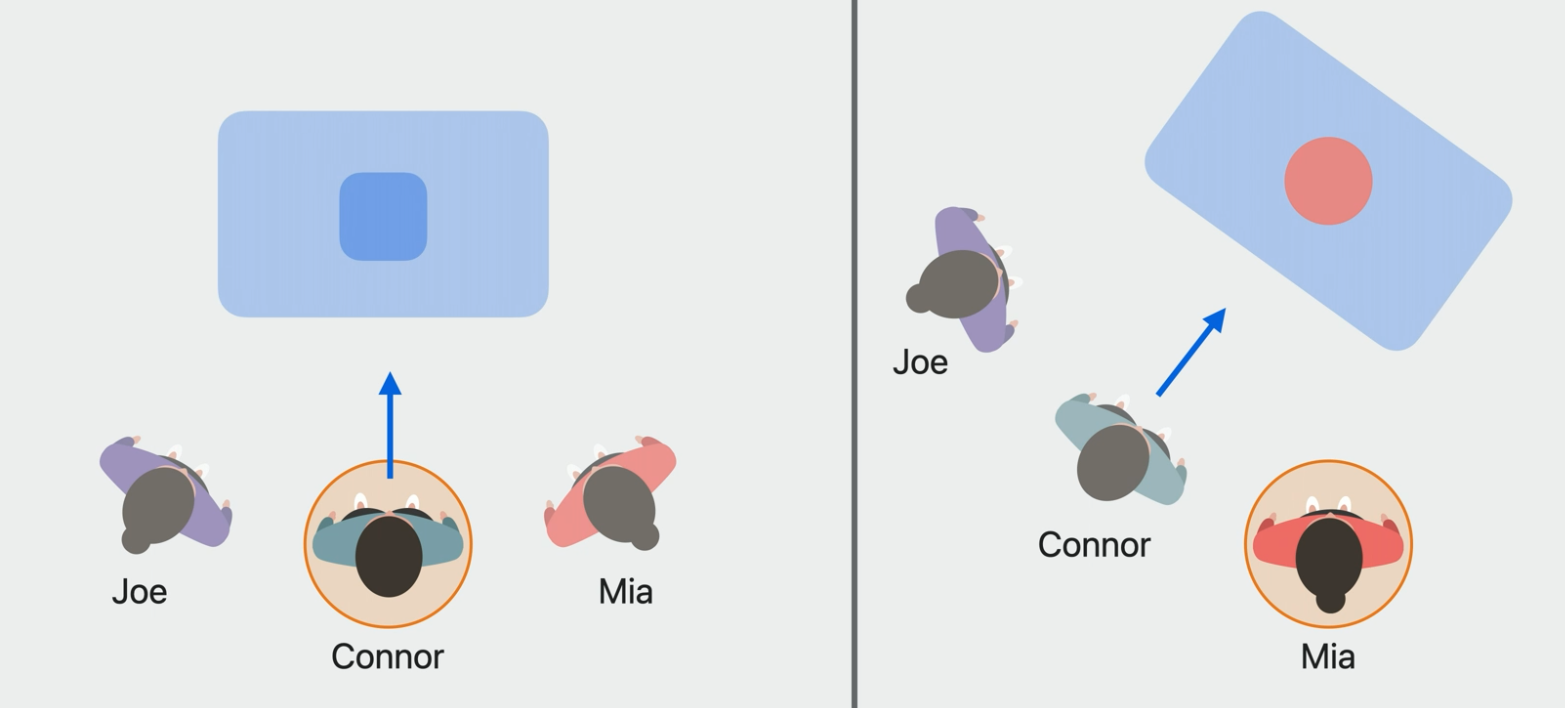
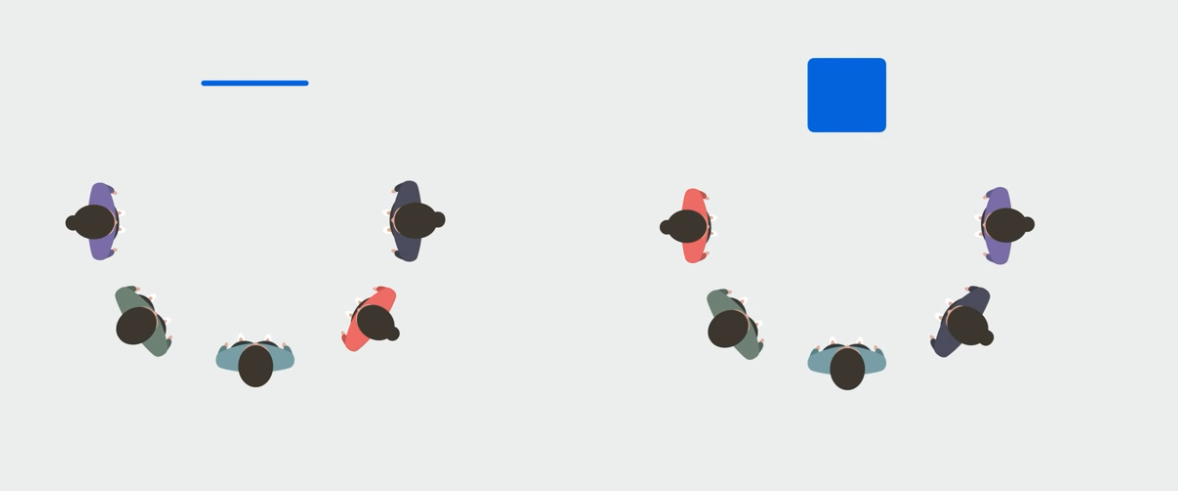
Bringing it back to our earlier example, here the app doesn’t have visual consistency.
-
If Connor points to the square in the app, Mia will see Connor’s Persona point to the circle.
-
This breaks the illusion of being together.
-
However, if the app had visual consistency, Mia would clearly see that Connor was pointing to the square.
-
-
It’s the responsibility of the app to keep the content and its placement in sync for all participants.
-
This way, it feels like everyone is looking at the exact same app as if they were really together.
-
In the Design spatial SharePlay experiences session, we go in a lot more detail on these concepts.
-
Windowed apps
-
To support SharePlay in windowed apps, we’ve added the new system coordinator for group sessions.
- System coordinator is responsible for two things:
- receiving system state for the active SharePlay session
- letting you provide additional configurations during SharePlay.
- I’ll cover two of these which are relevant for both windowed and immersive apps:
- the isSpatial flag
- template preferences.
isSpatial flag
- I’ll cover two of these which are relevant for both windowed and immersive apps:
- System coordinator is responsible for two things:
-
Knowing if a participant is spatial or not is important when determining the required level of visual consistency.
-
For instance, here we have Connor’s first-person perspective.
-
He’s in a call with Mia in red, looking at a document that I shared with SharePlay.
-
Mia’s perspective of this scenario is on the right, where she sees Connor in blue.
-
When Connor scrolls, we would want to synchronize the scroll position.
-
That way, Mia will see Connor scroll and we still have visual consistency.
-
We actually do this when panning in a Freeform document while in SharePlay.
-
But if you’re not spatial, you don’t have the context of the other person interacting with the document.
-
So if Connor would scroll, we shouldn’t sync that, and Mia will keep seeing the document at the same spot.

-
- To observe if the local participant is spatial, and adjust what you’re syncing between participants, you first need to get the system coordinator for the group session.
-
You can know if the local participant is spatial by checking if isSpatial is true on the local participant state.
- To observe the state, you can use the localParticipantState property, which returns an async sequence that will iterate through updates of the local participant state.
for await session in ExploreActivity.sessions() {
  guard let systemCoordinator = await session.systemCoordinator else { continue }

  let isLocalParticipantSpatial = systemCoordinator.localParticipantState.isSpatial

  Task.detached {
      for await localParticipantState in systemCoordinator.localParticipantStates {
          if localParticipantState.isSpatial {
              // Start syncing scroll position
          } else {
              // Stop syncing scroll position
          }
      }
  }
}
Template preference
-
The system coordinator also offers apps a way to provide a template preference.
-
Templates are used to determine how all participants are placed by the system relative to the app to establish spatial consistency.
-
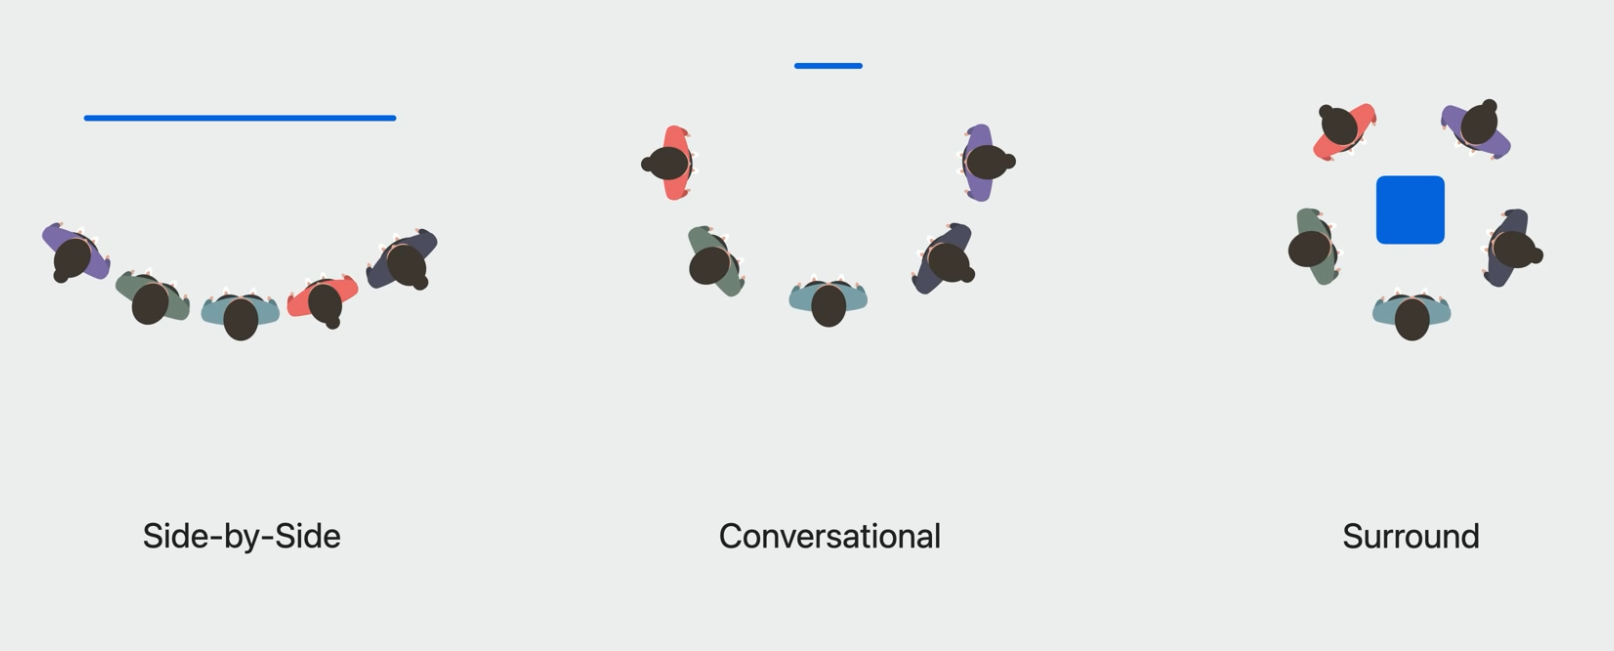
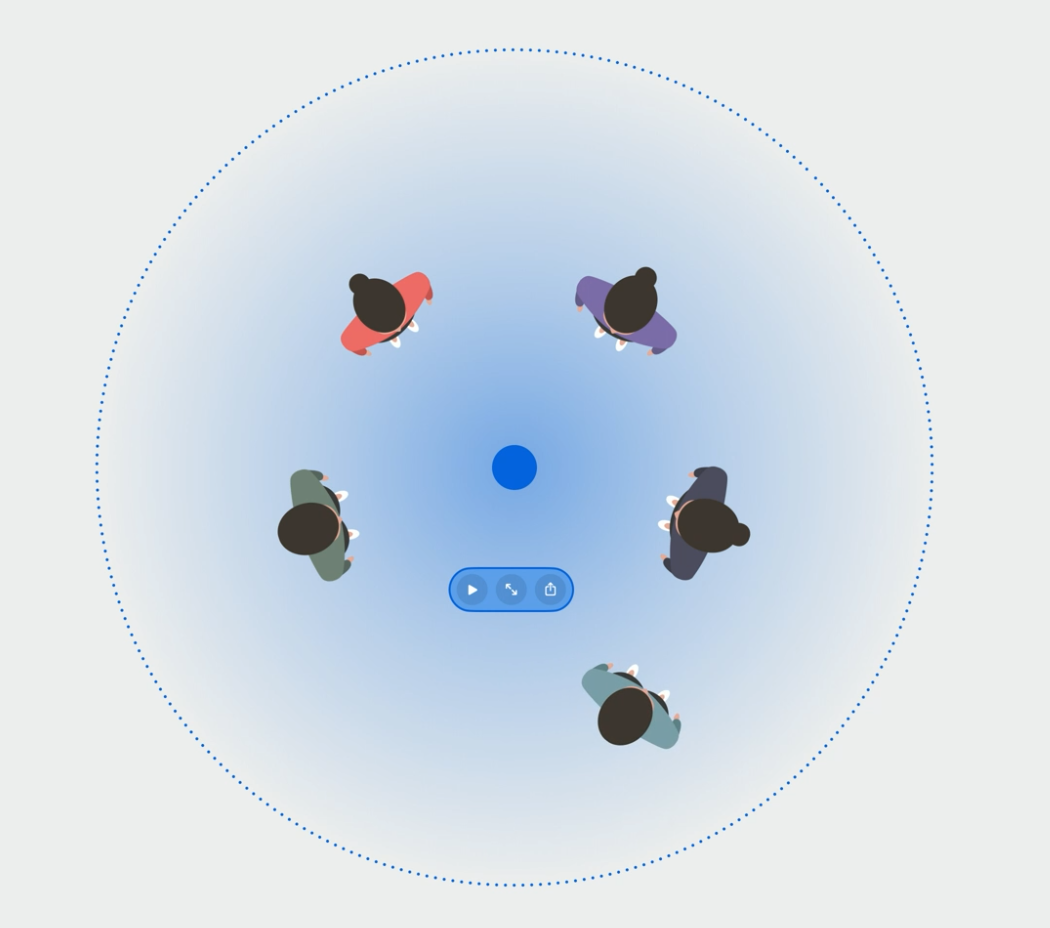
We support three different templates.
-
Side-by-Side, we’ll place all participants in an arc facing towards the shared app.
- This is the default template that will be applied when the app is using a regular window scene.
-
In the Conversational template, all participants are placed in a half circle, with the app placed in front of that half circle.
-
This is great for experiences where the focus isn’t on the content in the app.
- For instance, when playing music in SharePlay.
-
-
Lastly, we have the Surround template.
-
This places the participants in a circle, and the app is put in the center of the circle.
-
This template is only available when the app is using a volumetric scene.
-
The distance between the participants and the app is based on the size of the app.
-
If the app is bigger, it will be placed further from the people.
-
And if the app is smaller, it will get placed closer.
-
-
-
-
-
-
A SharePlay app can provide a template preference through the system coordinator.
-
FaceTime will try to apply this template while the group session is active.
-
There are three preferences available for SharePlay apps.
-
.none, which will follow the system default behavior, where it will be Side-by-Side for vertical apps and Surround for volumetric ones.
- This is the default preference that will be used.
- This is the default preference that will be used.
- There is also .sideBySide which will try to apply the Side-by-Side template, no matter what kind of app it is.
- And finally, there is .conversational, which will try to apply the corresponding template.
-
-
To configure the template preference, you just need to set it on the configuration of the system coordinator before calling join on the group session.
  for await session in ExploreActivity.sessions() {
  guard let systemCoordinator = await session.systemCoordinator else { continue }

  var configuration = SystemCoordinator.Configuration()
  configuration.spatialTemplatePreference = .sideBySide
  systemCoordinator.configuration = configuration

  session.join()
  }
-
-
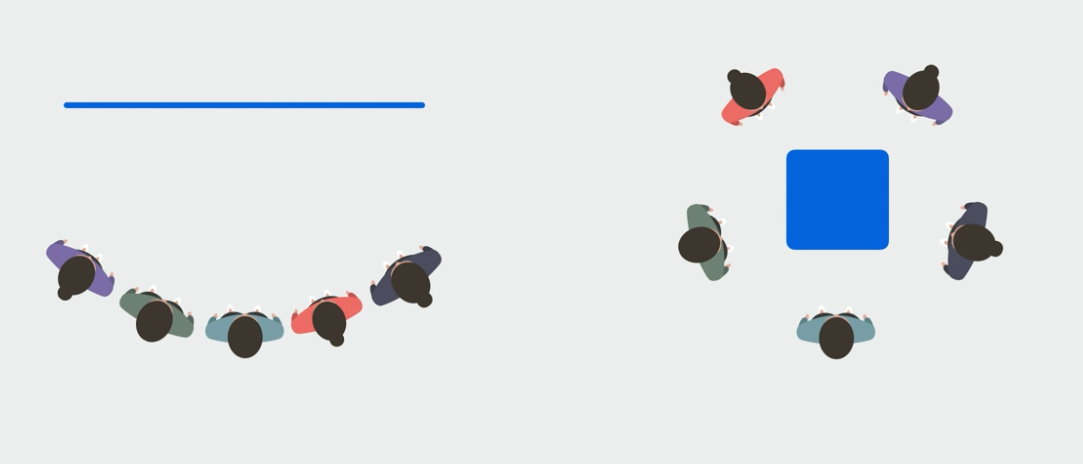
Templates are used to place the app and participant in an optimal position for the experience.
Scene Association
-
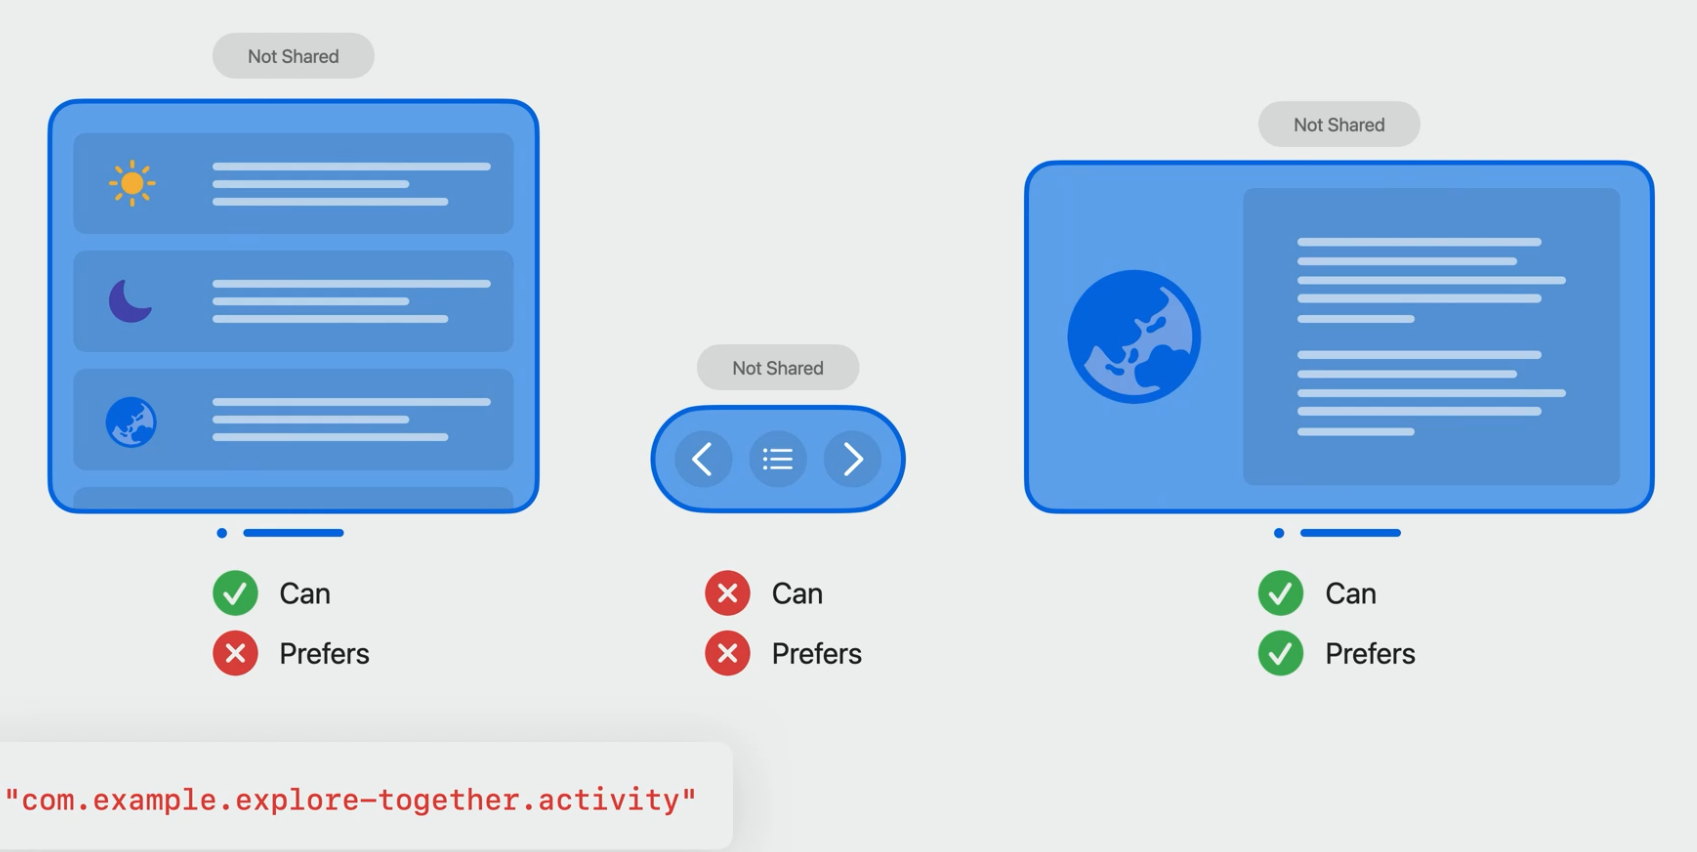
But what if your app has multiple window scenes and there is more than one currently foregrounded? In this example, we have an app with three scenes.
-
Seen on the left is a browse view.
-
The small scene in the middle provides an easy way to navigate through the content.
-
And the last scene provides detailed information about one piece of content.
-
All of these scenes can be open at the same time, so you can easily navigate the content while reading about it.

-
-
When in SharePlay, we want the detail scene to be the shared scene.But if all of them are open, the wrong scene could be used in the template. To solve that, we’ve added scene association.
- This is a way for the system to know which scene of the app is hosting the SharePlay activity.
-
There are two reasons we need to know this.
-
First, it allows the Share menu above a window to show to the person which scene is shared.
-
This is a helpful indicator when there are multiple windows open and will help prevent possible embarrassing situations where someone was accidentally interacting with a shared window without realizing it.
-
-
More importantly, however, it determines which window scene will be used with the template.
-
If your app is a single-scene app, you don’t need to worry about this.
-
Since there’s only ever one scene possible, we will automatically associate that scene with the group session.
-
However, multiscene apps will need to consider this when adopting SharePlay.
-
If not adopted, a random open scene will be selected, and it might not be the right one.
-
-
Let’s go over how you can adopt scene association.
-
We’ll start by looking at what happens for the person who started the SharePlay activity.
-
When the group activity gets activated, we’ll go through each of the scenes and check which scene can handle this.
-
We do that by evaluating the scene activation conditions against the activity identifier of the group activity.
-
Scene activation conditions consist of two checks, can and prefers.
- Can indicates that the scene could potentially handle it,
- while prefers will help direct it to a scene that is more ideally suited for it.
-
-
So we’ll start by checking the scene on the left to see if it can or prefers to handle the activity identifier.
-
It can but doesn’t prefer.
-
Next, we’ll check the middle scene, which can’t.
-
Finally, we’ll check the last scene, which both can and prefers.
-
Since the last scene can and is the preferred one, we’ll associate it with the group session.
-
If no scene could handle the identifier, we will launch a new window scene.
- This is great if your SharePlay experience requires its own scene to work in.
-
If multiple scenes can handle and none prefer, then one of those scenes will be randomly picked.
-
For the participants that didn’t activate the group activity and are receiving it, the same logic will execute if the app is already running.
-
If your app is not running, it will get launched and the first scene will be associated.
-
-
- To specify scene activation conditions for an app that uses the SwiftUI app lifecycle, you can use handlesExternalEvents. Just include the activity identifier of the group activity in either the preferring or allowing set of strings.
@main struct ExploreTogetherApp: App { var body: some Scene { WindowGroup { ContentView() .handlesExternalEvents( preferring: ["com.example.explore-together.activity"], allowing: ["com.example.explore-together.activity"] ) } } } - If your app uses the UIKit app life cycle, you can set the activation conditions on the UI scene by specifying predicates.
class SceneDelegate: NSObject, UISceneDelegate { func scene(_ scene: UIScene, willConnectTo session: UISceneSession, options connectionOptions: UIScene.ConnectionOptions) { // ... scene.activationConditions.canActivateForTargetContentIdentifierPredicate = NSPredicate(format: "self == %@", "com.example.explore-together.activity") scene.activationConditions.prefersToActivateForTargetContentIdentifierPredicate = NSPredicate(format: "self == %@", "com.example.explore-together.activity") } } -
To learn more about scene activation conditions, Targeting Content with Multiple Windows
-
Let’s consider one more example.
-
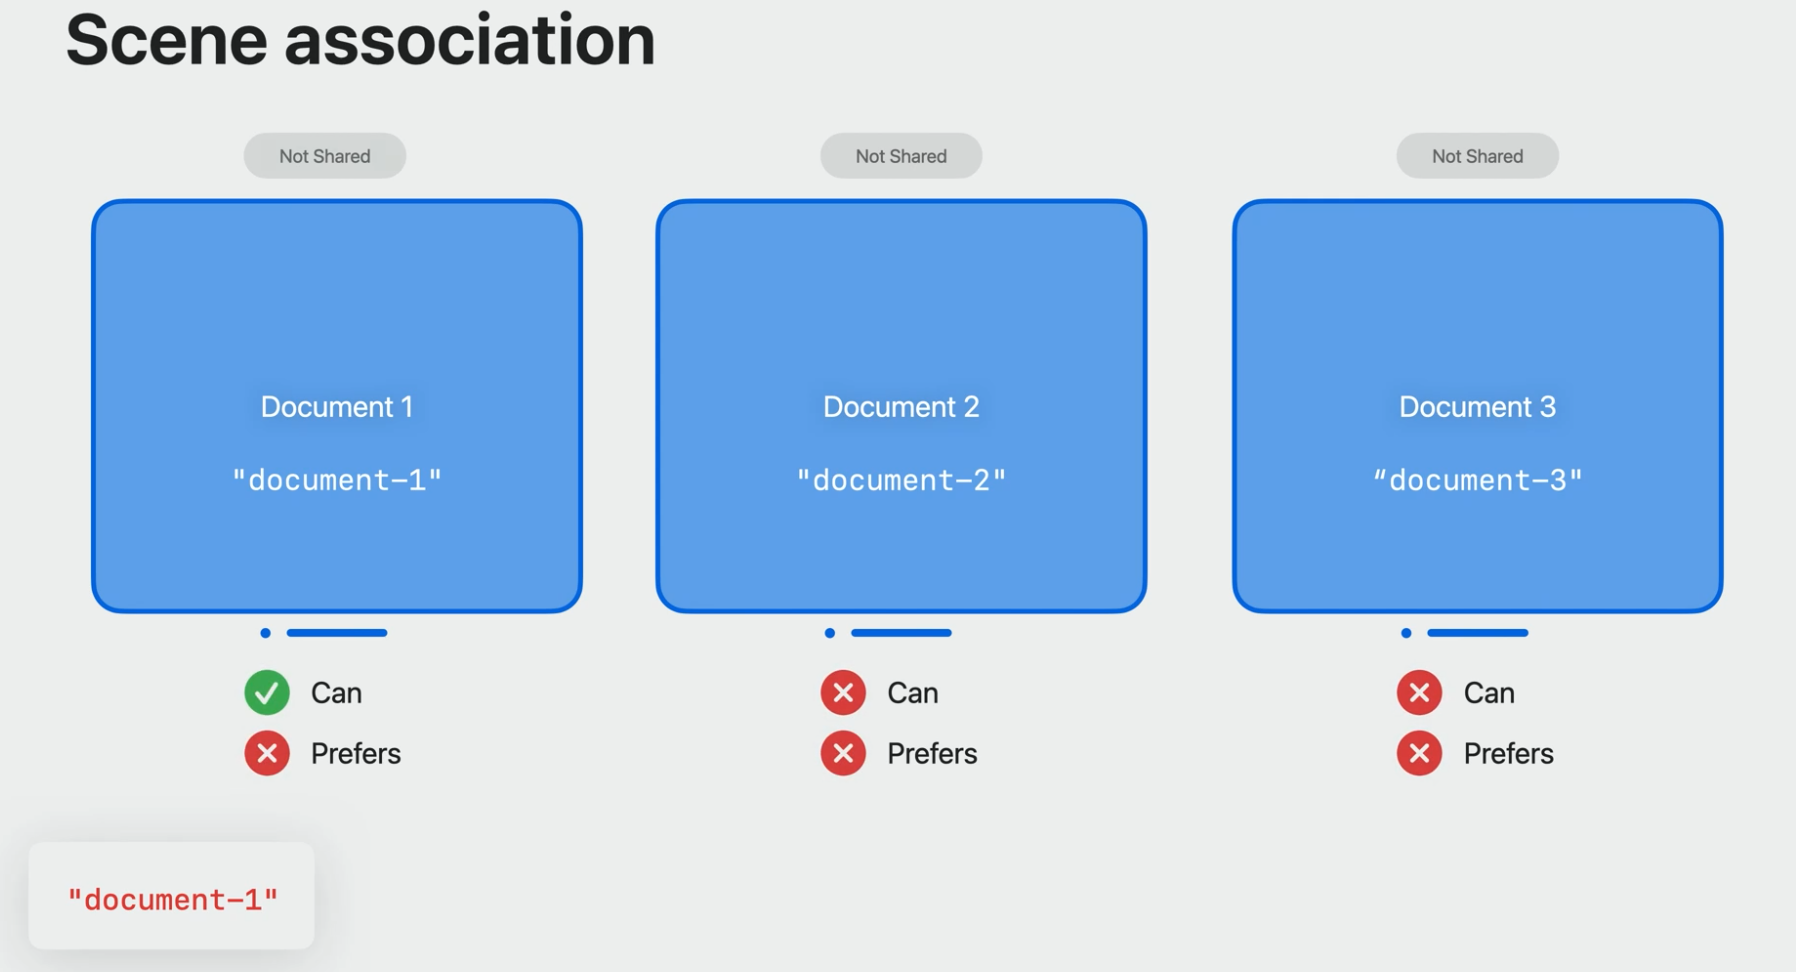
In this case, it’s a document-based app where each scene represents a different document.
-
Now we want to use SharePlay to collaborate on the first document.
-
We’ll again use the group activity identifier to evaluate each of the scene’s activation conditions.
-
Unfortunately, there isn’t anything inherently different about these scenes, so they all end up matching and the wrong scene gets associated.
-
In this case, we want to change the identifier that is used to match scenes with.
-
To accomplish this, we’ve added scene association behavior.
- This allows an app to provide an identifier that will be used to find the right scene.
-
-
Going back to our example, we could use a unique identifier of each document that all participants agree on.
- We’ll then use that identifier to find the right scene.
-
If we evaluate the scenes now, we can easily configure the scene activation conditions so only the first scene is matched, and we’ll end up with the right scene association.
-
- You can specify the identifier that will be used by setting the scene association behavior on the metadata of your group activity. So you want to use something that everyone will agree on.
- Keep in mind that the same identifier will be used for all other participants that join the SharePlay session.
struct ExploreActivity: GroupActivity {
  var metadata: GroupActivityMetadata {
  var metadata = GroupActivityMetadata()
  // ...
  metadata.sceneAssociationBehavior = .content("document-1")
  return metadata
  }
}
- Keep in mind that the same identifier will be used for all other participants that join the SharePlay session.
-
We support three types of scene association behavior.
-
Default is the behavior we looked at first, where the identifier that is used to associate the scene will be the group activity identifier. As the name indicates, this is a default behavior if you don’t explicitly specify one.
-
Content behavior allows you to specify a custom identifier.
- This is meant for apps where each of the scenes will show different content, and the group activity is tied to that content.
-
Finally, we offer the none behavior.
-
The none behavior will disable scene association. This means that no scene will be associated, so the person won’t see the shared banner above any of the scenes of your app.
-
It also means that spatial consistency is broken.
-
This should only be used in specific cases, such as immersive apps that don’t need an additional scene, or in cases where the content that is displayed in the scene is different for each participant in the SharePlay session.
-
-
Sometimes you might need to know what scene a group session is associated with.
-
This might happen if multiple scenes could potentially be selected for scene association.
-
To get this information, we exposed a new property on the group session called sceneSessionIdentifier.
- This property will include the identifier of the scene session that was associated with the group session.
-
-
- Scene association is crucial to build great SharePlay experiences, so definitely apply it if you have an app that supports multiple scenes.
Share menu
-
Finally, let’s talk about SharePlay from the Share menu.
-
When in FaceTime, every window has a share banner above it.
-
As we just saw, it will indicate which scene is shared while in SharePlay.
-
But it’s also useful when not in SharePlay.
-
When a scene is not shared, it will show different ways that that scene can be shared.
-
-
One option is to simply share the window.
-
Everyone else will see a noninteractive video feed of the window.
-
This works out of the box for all apps.
-
-
A SharePlay app can take this further, however.
-
By exposing a group activity that is relevant to the current content of the window, it will get surfaced in that menu.
-
This is a great way to improve the discoverability of your SharePlay activity and can also remove the need to have a dedicated SharePlay button in your app’s UI.
-
The way an app exposes the group activity is done through the same way as starting SharePlay via AirDrop.
-
-
-
In iOS 17, you can start SharePlay via AirDrop by having a SharePlay app open.
-
To fetch the group activity, the system goes through the UI responder chain of the scene that is being shown and tries to find a group activity that is specified in the activity items configuration of one of the responders.
-
That way you can just set the group activity on the activity items configuration of a view controller that is showing SharePlayable content, and it will get picked up automatically.
-
To configure the Activity Items configuration, you start by creating the activity that can be activated.
-
Next you’ll create an item provider and register the group activity on it.
-
You then initialize the UIActivityItemsConfiguration with the item provider.
-
Finally, you’ll need to make sure that the configuration exposes the right metadata, since that is what will be presented in the Share menu.
-
To do that, you can use the metadataProvider on UIActivityItemsConfiguration and provide an LPLinkMetadata object for the LinkPresentationMetadata key.
-
The title and image provider will be used in the Share menu.
-
All of this will also work if you use your own class that conforms to UIActivityItemsConfigurationReading. ```swift // Create the activity let activity = ExploreActivity()
-
-
// Register the activity on the item provider let itemProvider = NSItemProvider() itemProvider.registerGroupActivity(activity)
// Create the activity items configuration let configuration = UIActivityItemsConfiguration(itemProviders: [itemProvider])
// Provide the metadata for the group activity configuration.metadataProvider = { key in guard key == .linkPresentationMetadata else { return nil } let metadata = LPLinkMetadata() metadata.title = “Explore Together” metadata.imageProvider = NSItemProvider(object: UIImage(named: “explore-activity”)!) return metadata } self.activityItemsConfiguration = configuration
#### Immersive apps
- Now let's check out how SharePlay works for immersive apps. On this platform, we can easily create immersive experiences using Immersive Space.

    - Immersive Space is a special scene that allows an app to make its contents go beyond boundaries with different immersion styles.

        - When the app opens an Immersive Space, the system backgrounds all other apps, and people can be fully focused in the unbounded world of this app.

            - You can check out this session to learn more about Immersive Space and Immersion Styles.
                - <a class='internal-link' href='/go-beyond-the-window-with-swiftui'>Go beyond the window with SwiftUI</a>

- During FaceTime, you can launch an Immersive Space at any time.

    - When you are in a private immersive space, you are in your own private world, and you break shared context with everyone else.

        - Because of this, the system will hide other people for you.

        - And they will see you as your contact photo, which indicates you are not with them right now.

        - Everyone can still communicate by audio.

    - But come on, we don't want to be alone in FaceTime.

        - Let's share the magical moments in the immersive world.

        - I have got many great ideas of immersive experiences which I would love to share with my friend.

        - For example, it could be a group activity like this, hanging out in outer space and exploring our beautiful planet together.

        - To accomplish this, our shared app needs to configure a group immersive space that can be shared with everyone.
##### Spatial Consistency
- In the configuration of the system coordinator, you can find the supportsGroupImmersiveSpace flag.

    - By enabling it, the app tells the system that Immersive Space in this app is meant to be shared and wants to support immersive group activities.
    ```swift
    for await session in ExploreActivity.sessions() {
        guard let systemCoordinator = await session.systemCoordinator else { continue }

        var configuration = SystemCoordinator.Configuration()
        configuration.supportsGroupImmersiveSpace = true
        systemCoordinator.configuration = configuration
    }
    ```
    - When people join a group session that has this flag enabled, their immersive space will become a group immersive space.

    - The system will move the space origin to a shared location defined by the template to establish a shared coordinate system for spatial consistency.

    - People in the group immersive space will see each other as Personas.

    - Now we have got a group immersive space with a shared coordinate system and people in there, we can place objects at the same location in it to get spatial consistency.

    - In the globe explore activity example, we can place a globe in the center above the origin and make sure we apply the same offset relative to the origin for everyone.

    - Everyone will then see the globe at the same spot.
<img src="/assets/Step_Nine_VisionOS_Assets/SharePlay12.png"/>
##### Visual Consistency
- Next, we will figure out how to maintain visual consistency.

- For instance, if we want to rotate the globe, we will need to make sure that its orientation is synced between everyone.

- To learn more about how to use GroupSession and GroupSessionMessenger to synchronize state, check out this SharePlay session.
    - [Build custom experiences with Group Activities](https://developer.apple.com/videos/play/wwdc2021/10187)

##### Relative Elements
- We could also add some UI elements relative to each person in a group immersive space.

###### Example 1
- For example, we can give every participant a private control menu like this.

    - It's right in front of them.

    - They can use it to manipulate the shared globe easily.

    - To place this control properly, we have to know where the local user is in the group immersive space.

    - We can utilize the systemExperienceDisplacement method in GeometryReader3D.

    - This method tells you how the system has placed space origin away from the local user.

    - it returns a Pose3D struct, which has both translation and rotation.

    - In order to get where the local user is relative to the space origin, we can invert this pose.

    - Then we can use it to offset and rotate the control, so it will appear relative to the local user.
    ```swift
    // Use immersiveSpaceDisplacement to offset contents in group immersive space

    var body: some Scene {
        ImmersiveSpace(id: "earth") {
            GeometryReader3D { proxy in
                let displacement = proxy.immersiveSpaceDisplacement(in: .global).inverse

                Control()
                    .offset(displacement.position)
                    .rotation3DEffect(displacement.rotation)
            }
        }
    }
    ```
    - One thing to note is that the displacement does not update if the user moves.

    - It only provides a displacement of the space when it was initially placed.
    <img src="/assets/Step_Nine_VisionOS_Assets/SharePlay13.png"/>
    - This offers an easy way to place content relative to the person without needing to fully track where they are.

- The surround template is great for the globe explore activity, where the app only has a group immersive space with a shared content in the center.


###### Example 2 Change the Template
- But what if your group activity has both a shared window and a group immersive space? For example, I want to build a group activity for studying the solar system like this, where people can start by reading about a planet on a shared window.

    - And they can press a button to take a closer look at the planet model in a group immersive space.

    - I would love people to always stay side by side in both cases.

- Let's check out what we can do with template.

    - By default, when your app only has a group immersive space, the Surround template will be applied, and the space origin will be placed in the center.

    - The same layout is applied when your app also has a shared volumetric scene.

    - But if your app has a shared vertical window, the Side-by-Side template will be chosen by default, and the space origin is right below the shared window.

    - But keep in mind, you can always change the template preference to the one that fits your group activity best.

        - You can choose the .conversational template or the .sideBySide template, which I think will be a great one for our solar exploration activity.

- As we learned before, the distances in the template are dynamically adjusted based on the size of the shared window.

    - You may wonder how we can ensure that the distance is good when there's only a group immersive space.

    - To solve this, we have a useful knob to tweak templates called content extent.

        - It's a modifier on the template preference, which works for both immersive and window-based group activities.

        - Apps can set this value as the distance from the center of the content to its farthest edge in points.

        - When content extent is set, the active template will factor in this value for placing the people relative to the app.

- All right, let's apply what we learned about template and configure the group session for the solar explore activity we showed before.

    - First, we should enable supportsGroupImmersiveSpace so people can view the object together while immersive.

    - Next, let's set the template preference to .sideBySide and also add a modifier for the contentExtent so people can always stay side by side and have a great distance with the shared content.
```swift
// Configure the spatial template preferences with content extent

for await session in ExploreSolarActivity.sessions() {
    guard let systemCoordinator = await session.systemCoordinator else { continue }

    var configuration = SystemCoordinator.Configuration()
    configuration.supportsGroupImmersiveSpace = true
    configuration.spatialTemplatePreference = .sideBySide.contentExtent(200)
    systemCoordinator.configuration = configuration
}
-
Cool. Let’s check out what this group activity would look like with people.
-
Here, I’m with my friend Connor, and we’re browsing planets on a shared window side by side.
-
Later, I press a button, which lets me go into a group immersive space to explore Saturn.
-
While I am amazed by how beautiful this model is, I also find Connor is not with me anymore, and all I see is his contact photo.
-
But actually, Connor is left behind, still watching the window.
-
He needs to press the button himself to enter the group immersive space.
-
As we learned before, when people are not in the group immersive space together, they would have no shared context.
- So the system will hide Spatial Personas and show contact photos.
-
If we can still see each other’s Persona, Connor may feel really confused when I look surprised at something he doesn’t see.
-
Same situation could happen if our group immersive spaces are presenting in different immersion styles.
-
For example, I’m looking around in a fully immersive environment, but Connor remains in passthrough.
-
But it would be so nice if Connor can just follow me into the same group immersive space automatically.
-
And when he’s not with me there, he could know where I am and join me easily.
-
-
To minimize split contacts in your immersive group activity, we have a great tool you can utilize in the system coordinator called groupImmersionStyle.
-
It provides an async sequence of optional immersion style, which tells your app a specific immersion style of the group immersive space that other people join, or nil when they leave a group immersive space.
-
For example, when I open a group immersive space, Connor’s app will receive the immersion style of it, and his app can open a group immersive space with a matching style.
-
Then we will be together in the group immersive space and have shared context again.
-
Likewise, when Connor presses the button and leaves the group immersive space, my app will receive nil and can dismiss immersive space.
-
Now with the help of group immersion style, everyone can always be together.
-
-
Sometimes you may want to step out of the immersive experience temporarily for something urgent.
-
You can do it with a single press on the Digital Crown.
-
In this case, the system will not disturb other people and change their group immersion style.
-
When you step out, you will see a SharePlay banner notice, which tells you where the rest of the group is and also provides you a button to join back to the group immersive space easily.
- When you tap on the Join button, a group immersion style will be sent to your app for setting up the group immersive space.
-