Work with Reality Composer Pro content in Xcode
Work with Reality Composer Pro content in Xcode
The next step Apple suggest is to learn about the working with USD(Universal Scene Description) files using Reality Composer Pro, here is the next step after Explore Materials in Reality Composer Pro
“Learn how to bring content from Reality Composer Pro to life in Xcode. We’ll show you how to load 3D scenes into Xcode, integrate your content with your code, and add interactivity to your app. We’ll also share best practices and tips for using these tools together in your development workflow. To get the most out of this session, we recommend first watching “Meet Reality Composer Pro” and “Explore materials in Reality Composer Pro” to learn more about creating 3D scenes.” -Apple
Overview
- We will arrange a slider and point of interest button for diorama.
Load 3D Content
- We load the entity in DioramaView using
RealityView { content in do { let entity = try await Entity(named: "DioramaAssembled", in: realityKitContentBundle) content.add(entity) } catch { // Handle error } } - Anatomy of a Reality Composer Pro package
- If there are USD assets you’re using in your Xcode project that you’re not adding to a Reality Composer Pro project, we strongly encourage you to put those assets into a Swift Package, with an .rkassets directory inside it, like this. Xcode compiles the .rkassets folder into a format that’s faster to load at runtime.
- The entity we just loaded is actually the root of a larger entity hierarchy. It has child entities and they in turn have child entities. It’s everything we arranged in our Reality Composer Pro scene. If we wanted to address one of the entities lower down in the hierarchy, we could give it a name in Reality Composer Pro, and then at runtime, we could ask the scene to find that entity by its name.
- Entity Component System parallels with Object, Property, and Function with
- Object == Entity
- An entity is any thing you see in the scene. They can also be invisible. They don’t hold attributes or data though.
- Property == Component
- Data is placed into components
- Can be removed or added to entity during app execution
- Function == System
- Behavior, once per frame
- Query for entity and add function
- That’s where you put your ongoing logic. In your system, you query for all entities that have a certain component on them, or configuration of components, and then you perform some action and store the updated data back into those components.
- To learn more see
- Object == Entity
Components
- To add component to an entity in swift
let component = MyComponent() entity.components.set(component) - To do in Reality Composer Pro
- Select entity in heirarchy
- Add component via Inspector Panel
- Only one component type, it’s a set
- Custom components
- Mark the position of floating buttons in Reality Composer Pro
-

- Add entities
- Let’s make our first location marker entity, Ribbon Beach, which is a place on Catalina Island.
- We click the plus menu and select Transform to make us a new invisible entity. We can name our entity Ribbon_Beach.
- Let’s put this entity where Ribbon Beach actually is on the island.
- Create custom component
-
We click on the Add Component button, but this time, we select New Component because we’re going to make our own.
-
Let’s give it a name, PointOfInterest. Now it shows up in the Inspector Panel just like our other components do.
-
But what’s this count property? Let’s open our new component in Xcode. In Xcode, we see that Reality Composer Pro created PointOfInterestComponent.swift for us.
-
- Edit in Xcode
- Add custom component to entities
- Fill in component Data
- Reality Composer Pro projects are Swift packages, and the Swift code we just generated lives here in the package.
- Looking at the template code, we see that that’s where the count property came from. Let’s have another property instead.
- We want each point of interest to know which map it’s associated with so that when you change maps, we can fade out the old points of interest and fade in the appropriate ones.
- So we add an enumeration property, var region. Let’s make our enum region up here… …and give it two cases, since we’re only building two maps right now: Catalina and Yosemite.
- It can serialize as a string. We also conform it to the Codable protocol so that Reality Composer Pro can see it and serialize instances of it.
- Back in Reality Composer Pro, the count property has gone away and our new region property shows up. It has a default value of yosemite because that’s what we initialized in the code, but we can override it here for this particular entity.
- If we override it, this value will only take effect on this particular entity. The rest of the point of interest components will have the default value of yosemite unless we override them too.
- We’re using our PointOfInterestComponent like a signifier, a marker that we stick on these entities. These entities act like placeholders for where we’ll put our SwiftUI buttons at runtime. We add our other Catalina Island points of interest the same way we just added Ribbon Beach.
- Let’s run our app and see what our new custom component does.
- Oh! It doesn’t do anything. That’s because we haven’t written any code to handle these point of interest components yet.
- Add entities
User Interface
- Let’s do that. We have a new way of putting SwiftUI content into a RealityKit scene. This is called the Attachments API.
- We’re going to combine attachments with our PointOfInterestComponent to create hovering buttons with custom data at runtime.
- Let’s first see this in code and then I’ll walk you through the data flow.
- Attachments are a part of the RealityView. Let’s first look at a simplified example to show the structure of a RealityView so we can see how SwiftUI views get into a RealityKit scene.
- The RealityView initializer that we’re going to use takes three parameters: a make closure, an update closure, and an attachments ViewBuilder.
- Fleshing this out a little, let’s add a bare-minimum implementation of creating an Attachment View, a green SwiftUI button, and adding it to our RealityKit scene.
RealityView { _, _ in // load entities from your Reality Composer Pro package bundle } update: { content, attachments in if let attachmentEntity = attachments.entity(for: "🐠") { content.add(attachmentEntity) } } attachments: { Button { ... } .background(.green) .tag("🐠") }- In the Attachments ViewBuilder, we make a normal SwiftUI view; we can use view modifiers and gestures and all the rest that SwiftUI gives us. We tag our View with any unique hashable. I’ve chosen to tag this button view with a fish emoji.
- Later, when SwiftUI invokes our update closure, our button View has become an entity. It’s stored in the attachments parameter to this closure, and we fish it out using the tag we gave it before.
- We can then treat it like any other entity. We can add it as a child of any existing entity in our scene, or we can add it as a new top-level entity in the content’s entities collection.
- And since it’s become a regular entity, we can set its position so it shows up where we want in 3D, and we can add any components we want as well.
- Here’s how data flows from one part of the RealityView to another. Let’s look at the three parameters to this RealityView initializer.
- The first is make, which is where you load your initial set-up scene from your Reality Composer Pro bundle as an entity and then add it to the RealityKit scene.
- The second is update, which is a closure that will be called when there are changes to your view’s state. Here, you can change things about your entities, like properties in their components, their position, and even add or remove entities from the scene. This update closure is not executed every frame. It’s called whenever the SwiftUI view state changes.
- The third is the attachments ViewBuilder. This is where you can make SwiftUI views to put into your RealityKit scene. Your SwiftUI views start out in the attachments ViewBuilder, then they are delivered to you in the update closure in the attachments parameter.
- Here, you ask the attachments parameter if it has an entity for you using the same tag you gave to your button in the attachments ViewBuilder.
- If there is one, it vends you a RealityKit entity.
- In your update closure, you set its 3D position and add it to your RealityKit scene so you can see it floating in space wherever you want.
- Here, I’ve added my button entity as a child of a sphere entity. I positioned it 0.2 meters above its parent.
- The make closure also has an attachments parameter. This one is for adding any attachments that you have ready to go at the time this view is first evaluated, because the make closure is only run once.
- Now that we have understood the general flow of a RealityView, let’s get further into the update closure.
- The parameter to your make and update closures is a RealityKitContent. When you add an entity to your RealityKit content, it becomes a top-level entity in your scene.
- Likewise, from your update function, adding an entity to your content gives you a new top-level entity in your scene. While the make closure will only be called once, the update closure will be called more than once.
- If you create a new entity in your update closure and add it to your content there, you’ll get duplicates of that entity, which might not be what you want.
- To guard against that, you should only add entities to your content that are created somewhere that’s only run once. You don’t need to check if the content.entities already contains your entity. It’s a no-op if you call add with the same entity twice, like a set.
- It’s the same when you parent an entity to an existing entity in your scene – it won’t be added twice.
- Attachment entities are not created by you; they’re created by the RealityView for each attachment view that you provide in your attachments ViewBuilder. That means it’s safe to add them to the content in your update closure without checking if it’s already there.
- So, that was how we’d write our attachments code if we wanted to hardcode our points of interest in the attachments ViewBuilder.
 let myEntity = Entity()

 RealityView { content, _ in
     if let entity = try? await Entity(named: "MyScene", in: realityKitContentBundle) {
         content.add(entity)
     }
 } update: { content, attachments in

     if let attachmentEntity = attachments.entity(for: "🐠") {
         content.add(attachmentEntity)
     }

     content.add(myEntity)

 } attachments: {
     Button { ... }
        .background(.green)
        .tag("🐠")
 }
- But since we want to let the data in our Reality Composer Pro project drive the experience, let’s make it more flexible.
- That way, a designer or producer can create the points of interest in the Reality Composer Pro project, and our code can accommodate whatever data they add.
- To make it data-driven, we need our code to read the data that we set up in our Reality Composer Pro scene.
- We’ll be creating our attachment views dynamically.
- High level, here’s what we’re going to do. In Reality Composer Pro, we already set up our placeholder entity for Ribbon Beach, and we’ll do the same for the other points of interest that we want to highlight in our diorama.
- We’ll fill out all the info each one needs, like their name and which map they belong on.
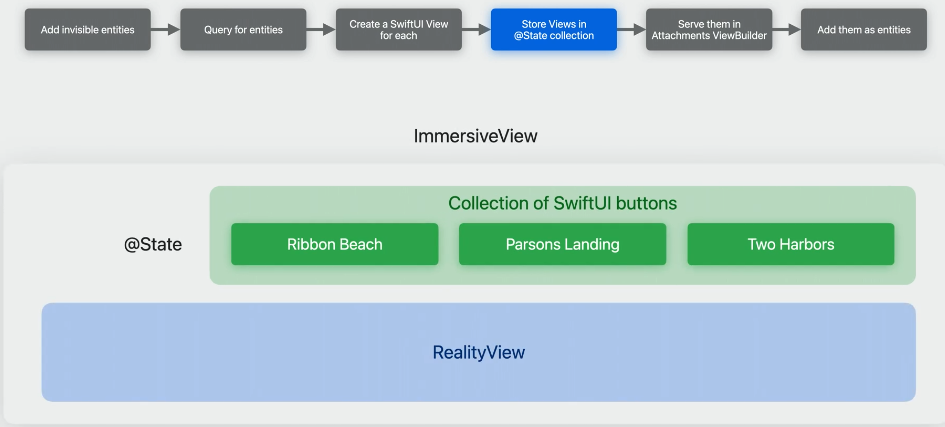
- Now, in code, we’ll query for those entities and create a new SwiftUI button for each one. In order to get SwiftUI to invoke our attachments ViewBuilder every time we add a new button to our collection, we’ll add the @State property wrapper to this collection.
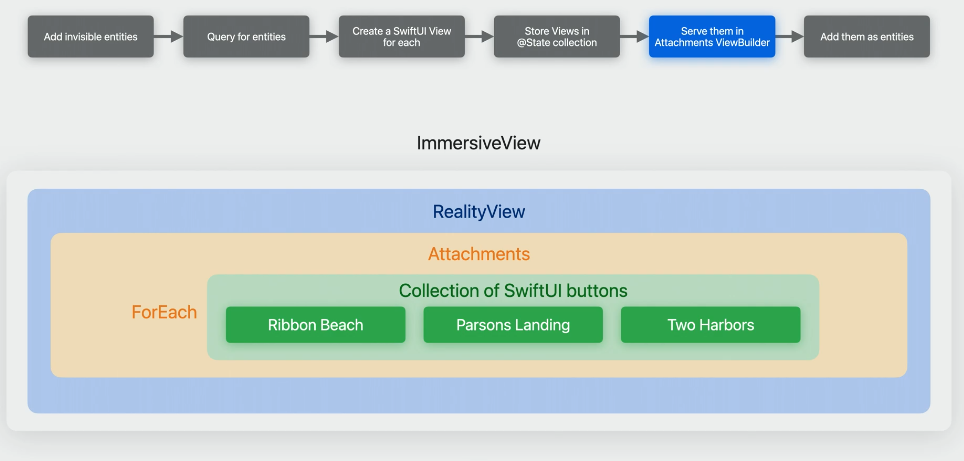
- We’ll serve those buttons up to the attachments ViewBuilder. Then finally, in the update closure of our RealityView, we’ll receive our buttons as entities and add those new button entities to the scene.
- We’ll add each one as a child of the marker entities we set up in Reality Composer Pro.
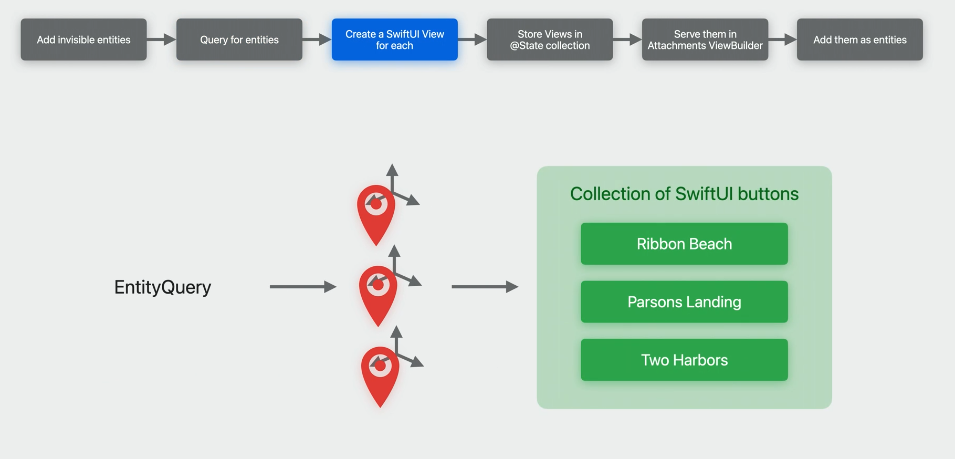
- Let’s understand these six steps through a more detailed diagram, and then we’ll look at the code.
- First, we add invisible entities in our Reality Composer Pro scene. We position our invisible entities where we want our buttons to show up, on the x-, y-, and z-axes. We’re making use of the Transform Component here, which all entities have by default.
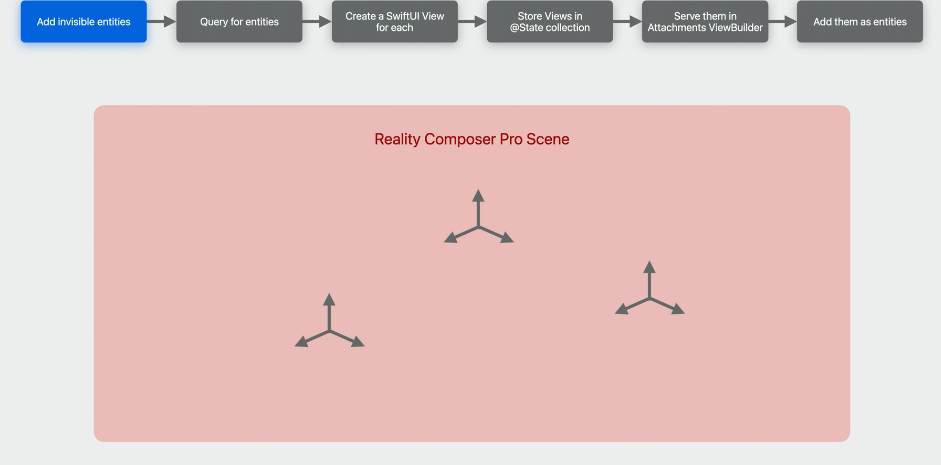
- Then we add our PointOfInterestComponent to each of them. In our code, we get references to these entities by querying for all entities in the scene that have the PointOfInterestComponent on them. The query returns the three invisible entities we set up in Reality Composer Pro.

- We create a new SwiftUI view for each one and store them in a collection.
- To get our buttons into our RealityView, we’ll make use of the SwiftUI view-updating flow. This means adding the property wrapper @State to the collection of buttons in our View. The @State property wrapper tells SwiftUI that when we add items to this collection, SwiftUI should trigger a view update on our ImmersiveView. That will cause SwiftUI to evaluate our attachments ViewBuilder and our update closure again.
- The RealityView’s attachments ViewBuilder is where we’ll declare to SwiftUI that we want these buttons to be made into entities.
- Our RealityView’s update closure will be called next, and our buttons will be delivered to us as entities. They’re no longer SwiftUI Views now. That’s why we can add them to our entity hierarchy.
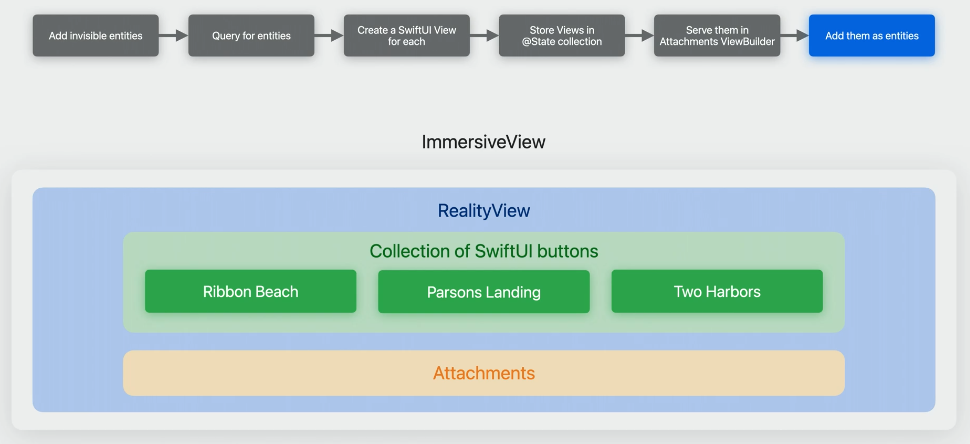
- In the update closure, we add our attachment entities to the scene, positioned floating above each of our invisible entities. Now they will show up visually when we look at our diorama scene.
- Let’s see how each of these steps is done.
- First, we mark our invisible entities in our Reality Composer Pro scene.
- Second, to find our entities that we marked, we’ll make an EntityQuery. We’ll use it to ask for all entities that have a PointOfInterestComponent on them.
- Third, we’ll then iterate through our QueryResult and create a new SwiftUI View for each entity in our scene that has a PointOfInterestComponent on it.
- We’ll fill it in with information we grab from the component, the data we entered in Reality Composer Pro. That view is going to be one of our attachments, so we put a tag on it. In this case, we’re getting serious, so we’ll use an ObjectIdentifier rather than a fish emoji. ```swift static let markersQuery = EntityQuery(where: .has(PointOfInterestComponent.self)) @State var attachmentsProvider = AttachmentsProvider()
rootEntity.scene?.performQuery(Self.markersQuery).forEach { entity in guard let pointOfInterest = entity.components[PointOfInterestComponent.self] else { return }
let attachmentTag: ObjectIdentifier = entity.id let view = LearnMoreView(name: pointOfInterest.name, description: pointOfInterest.description) .tag(attachmentTag) attachmentsProvider.attachments[attachmentTag] = AnyView(view) } ``` - Fourth, here’s the part where we make our collection of SwiftUI Views. We’ll call it attachmentsProvider since it will provide our attachments to the RealityView’s attachments ViewBuilder. We’ll then store our view in the attachmentsProvider.
- Let’s take a look at that collection type. AttachmentsProvider has a dictionary of attachment tags to views. We type-erased our view so we can put other kinds of views in there besides our LearnMoreView.
- We have a computed property called sortedTagViewPairs that returns an array of tuples – tags and their corresponding views – in the same order every time.
- Fifth, in the attachments ViewBuilder, we’ll ForEach over our collection of attachments that we made. This tells SwiftUI that we want one view for each of the pairs we’ve given it, and we provide our views from our collection.
- We’re letting the ObjectIdentifier do double duty here as both an attachment tag for the view, and as an identifier for the ForEach structure. ```swift @Observable final class AttachmentsProvider { var attachments: [ObjectIdentifier: AnyView] = [:] var sortedTagViewPairs: [(tag: ObjectIdentifier, view: AnyView)] { … } }
…
@State var attachmentsProvider = AttachmentsProvider()
RealityView { _, _ in
} update: { _, _ in
} attachments: { ForEach(attachmentsProvider.sortedTagViewPairs, id: .tag) { pair in pair.view } } ```
- So, why didn’t we just add a tag property to our PointOfInterestComponent instead?
- Attachment tags need to be unique, both for the ForEach struct and the attachments mechanism to work.
- And since all the properties in our custom component will be shown in Reality Composer Pro’s Inspector Panel when you add the component to an entity, that means the attachmentTag would show up there too.
- We don’t want to burden ourselves with having to remember to uniquify all the tags when we’re adding each point of interest in Reality Composer Pro. But, conveniently for us, entities conform to the Identifiable protocol, so they have identifiers that are unique automatically.
- We can get this identifier at runtime from the entity without needing to know it ahead of time when we’re designing our scene in Reality Composer Pro.
- To have the attachmentTag property not show up in Reality Composer Pro, we use a technique that I call “design-time versus runtime components.”
- We’ll separate our data into two different components, one for design-time data that we want to arrange in Reality Composer Pro, and one for runtime data that we will attach to those same entities dynamically at runtime.
- This is for properties that we don’t want to show in our Inspector Panel in Reality Composer Pro. So we’ll define a new component, PointOfInterestRuntimeComponent, and move our attachment tag inside it.
// Design-time component public struct PointOfInterestComponent: Component, Codable { public var region: Region = .yosemite public var name: String = "Ribbon Beach" public var description: String? } // Run-time component public struct PointOfInterestRuntimeComponent: Component { public let attachmentTag: ObjectIdentifier } - Reality Composer Pro automatically builds the component UI for you based on what it reads in your Swift package. It inspects the Swift code in your package and makes any codable components it finds available for you to use in your scenes.
- Here we’re showing four components. Components A and B are in our Xcode project, but they are not inside the Reality Composer Pro package, so they won’t be available for you to attach to your entities in Reality Composer Pro. Component C is inside the package but it is not codable, so Reality Composer Pro will ignore it. Of the four components shown here, only Component D will be shown in the list in Reality Composer Pro because it is within the Swift package and it is a codable component.
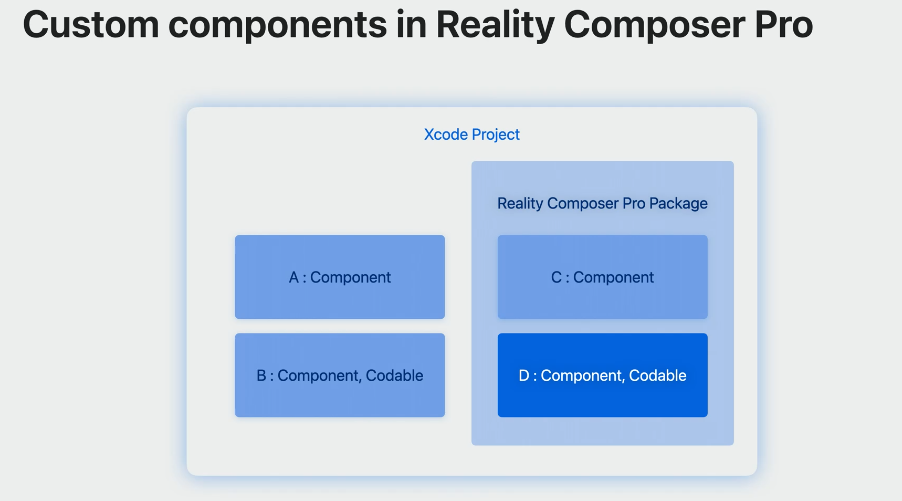
- That one is our design-time component, while all the others may be used as runtime components.
- Design-time components are for housing simpler data, such as ints, strings, and SIMD values, things that 3D artists and designers will make use of.
- You’ll see an error in your Xcode project if you add a property to your custom component that’s of a type that Reality Composer Pro won’t serialize.
- Back to Third Step, let’s get back to our code. We’ll first add our PointOfInterest runtime component to our entity and then use the runtime component to help us match up our attachment entities with their corresponding points of interest on the diorama.
- Here’s where our runtime component comes in. We’re at the part where we’re reading in our PointOfInterest entities and creating our attachment views. We queried for all our design-time components, and now we’ll make a new corresponding runtime component for each of them.
- We store our attachmentTag in our runtime component, and we store our runtime component on that same entity. In this way, the design-time component is like a signifier. It tells our app that it wants an attachment made for it.
- The runtime component handles any other kinds of data we need during app execution, but don’t want to store in the design-time component.
static let markersQuery = EntityQuery(where: .has(PointOfInterestComponent.self)) @State var attachmentsProvider = AttachmentsProvider() rootEntity.scene?.performQuery(Self.markersQuery).forEach { entity in guard let pointOfInterest = entity.components[PointOfInterestComponent.self] else { return } let attachmentTag: ObjectIdentifier = entity.id let view = LearnMoreView(name: pointOfInterest.name, description: pointOfInterest.description) .tag(attachmentTag) attachmentsProvider.attachments[attachmentTag] = AnyView(view) // Here is where we attach the runtime component to the entity created by design time component earlier. This is how we attach the attachmentTag from SwiftUI to Reality Composer Pro Entity via a Component. let runtimeComponent = PointOfInterestRuntimeComponent(attachmentTag: attachmentTag) entity.components.set(runtimeComponent) } - Last, the sixth step, in our RealityView, we have one more step before we see our attachment entities show up in our scene. Once we’ve provided our SwiftUI Views in the attachments ViewBuilder, SwiftUI will call our RealityView’s update closure and give us our attachments as RealityKit entities.
- But if we just add them to the content without positioning them, they’ll all show up sitting at the origin of the scene, position 0, 0, 0. That’s not where we want them. We want them to float above each point of interest on the terrain. We need to match up our attachment entities with our invisible point of interest entities that we set up in Reality Composer Pro.
- The runtime component we put on the invisible entity has our tag in it. That’s how we’ll match up which attachmentEntity goes with each point of interest entity.
- We query for all our PointOfInterestRuntimeComponents, we get that runtime component from each entity returned by the query, then we use the component’s attachmentTag property to get our attachmentEntity from the attachments parameter to the update closure.
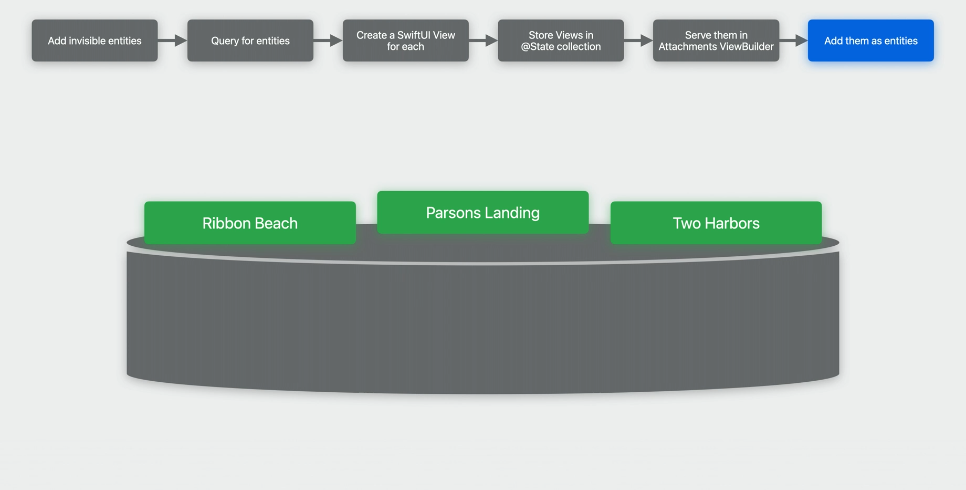
- Now we add our attachmentEntity to the content and position it half a meter above the point of interest entity. Let’s run our app again and see what these look like. Hey, they look great! We can see each place name floating above the spot where we put them in our Reality Composer Pro project.
static let runtimeQuery = EntityQuery(where: .has(PointOfInterestRuntimeComponent.self))

RealityView { _, _ in

} update: { content, attachments in x

    rootEntity.scene?.performQuery(Self.runtimeQuery).forEach { entity in
        guard let component = entity.components[PointOfInterestRuntimeComponent.self],
              let attachmentEntity = attachments.entity(for: component.attachmentTag) else {
            return
        }
        content.add(attachmentEntity)
        attachmentEntity.setPosition([0, 0.5, 0], relativeTo: entity)
    }
} attachments: {
    ForEach(attachmentsProvider.sortedTagViewPairs, id: \.tag) { pair in
        pair.view
    }
}
Play audio
- Next let’s find out how we play audio that we set up in Reality Composer Pro. To set up something that plays audio in Reality Composer Pro, you can bring in an audio entity by clicking the plus button, selecting Audio, and then selecting Ambient Audio.
- This creates a regular invisible entity with an AmbientAudioComponent on it. Let’s name our entity OceanEmitter because we’re going to use it to play ocean sounds for Catalina Island. You need to add an audio file to your scene as well. Let’s bring in our ocean sound.
- You can preview your audio component by selecting a sound in the Preview menu of the component in the Inspector Panel, but this won’t automatically play the selected sound when the entity is loaded in your app. For that, we need to load the audio resource and tell it to play.
- To play this sound, we’ll get a reference to the entity that we put the audio component on. We’ve named our entity OceanEmitter, so we’ll find our entity by that name.
- We load the sound file using the AudioFileResource initializer, passing it the full path to the audio file resource prim in our scene. We give it the name of the .usda file that contains it in our Reality Composer Pro project.
- In our case, that’s our main scene named DioramaAssembled.usda. We create an audioPlaybackController by calling entity.prepareAudio so we can play, pause, and stop this sound. Now we’re ready to call play on it. Here’s the ocean sound playing in our app. The slider in our app morphs between our two different terrain maps, Yosemite and Catalina Island.
  func playOceanSound() {

      guard let entity = entity.findEntity(named: "OceanEmitter"),
          let resource = try? AudioFileResource(named: "/Root/Resources/Ocean_Sounds_wav",
                                     from: "DioramaAssembled.usda",
                                     in: RealityContent.realityContentBundle) else { return }

      let audioPlaybackController = entity.prepareAudio(resource)
      audioPlaybackController.play()
  }
Material properties
- This creates a regular invisible entity with an AmbientAudioComponent on it. Let’s name our entity OceanEmitter because we’re going to use it to play ocean sounds for Catalina Island. You need to add an audio file to your scene as well. Let’s bring in our ocean sound.
- Now that we’ve introduced audio into our scene, we’re going to crossfade between two audio sources.
- We add a forest audio emitter the same way we added our ocean emitter entity. Let’s take a look at how we’re morphing our terrain using the slider, and we’ll also include audio in this transition.
- We’ll use a property from our Shader Graph material to morph between the two terrains. Let’s see how we do that. In Niels’s session, he created this beautiful geometry modifier for us using Reality Composer Pro’s Shader Graph.
- Now we can hook it up to our scene and drive some of the parameters at runtime. We want to connect this Shader Graph material with a slider. To do that, we need to promote an input node. Command-click on the node and select Promote.
- This tells the project that we intend to supply data at runtime to this part of the material. We’ll name this promoted node Progress, so we can address it by that name at runtime.
- We can now dynamically change this value in code. We get a reference to the entity that our material is on. Then we get its ModelComponent, which is the RealityKit component that houses materials. From the ModelComponent, we get its first material. There’s only one on this particular entity.
- We cast it to type ShaderGraphMaterial. Now, we can set a new value for our parameter with name Progress.
- Finally, we store the material back onto the ModelComponent, and the ModelComponent back onto the terrain entity. Now we’ll hook that up to our SwiftUI slider. Whenever the slider’s value changes, we’ll grab that value, which is in the range 0 to 1, and feed it into our ShaderGraphMaterial.
@State private var sliderValue: Float = 0.0 Slider(value: $sliderValue, in: (0.0)...(1.0)) .onChange(of: sliderValue) { _, _ in guard let terrain = rootEntity.findEntity(named: "DioramaTerrain"), var modelComponent = terrain.components[ModelComponent.self], var shaderGraphMaterial = modelComponent.materials.first as? ShaderGraphMaterial else { return } do { try shaderGraphMaterial.setParameter(name: "Progress", value: .float(sliderValue)) modelComponent.materials = [shaderGraphMaterial] terrain.components.set(modelComponent) } catch { } } } - Next, let’s crossfade between the ambient audio tracks for our two terrains.
- Because we’ve also put an AmbientAudioComponent on our two audio entities, ocean and forest, we can adjust how loud the sound plays using the gain property on them.
- We’ll query for all entities – all two at this point, our ocean and our forest – that have the AmbientAudioComponent on them. Plus, we added another custom component called RegionSpecificComponent so we can mark the entities that go with one region or the other.
- We get a mutable copy of our audioComponent because we’re going to change it and store it back onto our entity.
- We call a function that calculates what the gain should be given a region and a sliderValue. We set the gain value onto the AmbientAudioComponent, and then we store the component back onto the entity. ```swift @State private var sliderValue: Float = 0.0 static let audioQuery = EntityQuery(where: .has(RegionSpecificComponent.self) && .has(AmbientAudioComponent.self))
Slider(value: $sliderValue, in: (0.0)…(1.0)) .onChange(of: sliderValue) { _, _ in // … Change the terrain material property …
     rootEntity?.scene?.performQuery(Self.audioQuery).forEach({ audioEmitter in
         guard var audioComponent = audioEmitter.components[AmbientAudioComponent.self],
               let regionComponent = audioEmitter.components[RegionSpecificComponent.self]
         else { return }

         let gain = regionComponent.region.gain(forSliderValue: sliderValue)
         audioComponent.gain = gain
         audioEmitter.components.set(audioComponent)
     })
 }  }  ```
- We add a forest audio emitter the same way we added our ocean emitter entity. Let’s take a look at how we’re morphing our terrain using the slider, and we’ll also include audio in this transition.
- Let’s see that in action. Great! When we move the slider, we can see our Shader Graph material changing the geometry of the terrain map, and we can hear the forest sound fading out and the ocean sound coming in. We covered a lot of information today. Let’s recap. We’ve learned how to load our Reality Composer Pro content into our app in Xcode. We looked at how to create your own custom components in Reality Composer Pro. We explored how the SwiftUI Attachments API works and how they are delivered to us as entities. We saw how to set up audio and then play that audio in code. And finally, we saw how to take a promoted material property and drive it from code.